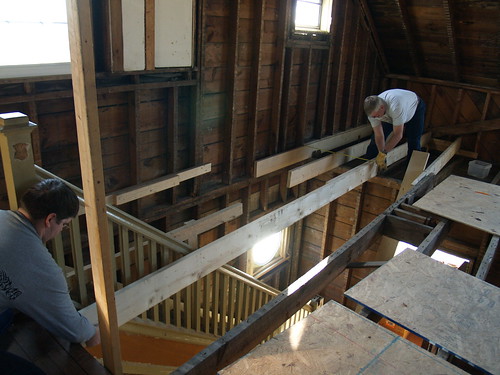
The story of the last couple of weekends, directly from Instagram.
So now we have a completed subfloor. Next up: Labor Day weekend and a lot of framing and plumbing.
Showing posts with label joists. Show all posts
Wednesday, August 28, 2013
Tuesday, March 31, 2009
the guest bedroom will be prettier soon
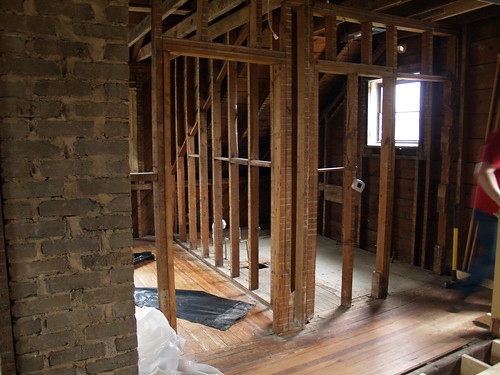
Remember this shot of the back half of the house?
Here's what it looked like Saturday evening, after Don and I finished moving every last little thing over to the front half, including the Anapurna tables downstairs and the tools upstairs.

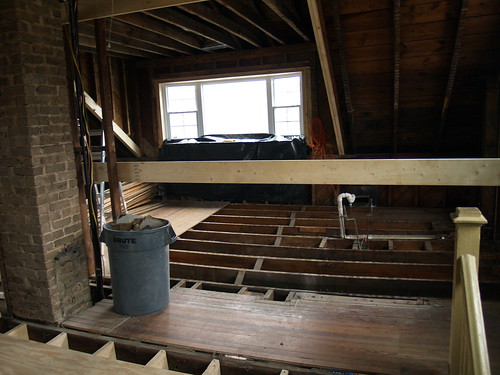
And here's what it looks like now:

That's right, progress! Don's dad came over early Sunday morning and the two of them removed the walls separating the eaves from the bedroom - the closet and the bathroom, just like in the master suite. Then Don's dad left, and Don spent the rest of the day pulling out the flooring all the way back to the chimney, as that's the first section they're going to work on. Leaving the floor in on the other section gives them a place to put debris and lets them keep up a wall that's holding the air conditioner up in the attic. When he was finished, Don installed the giant railing to keep me from falling to my death, because he's just a nice guy.
Soon, he'll start cutting out the joists and the old bathroom pipes (the plumber's going to be replacing them anyway) and there'll be a vast open space to be filled in with new joists and subfloor next time his dad comes over. Which, hopefully, will be soon. Scheduling these days is a nightmare.
Here's what it looked like Saturday evening, after Don and I finished moving every last little thing over to the front half, including the Anapurna tables downstairs and the tools upstairs.
And here's what it looks like now:
That's right, progress! Don's dad came over early Sunday morning and the two of them removed the walls separating the eaves from the bedroom - the closet and the bathroom, just like in the master suite. Then Don's dad left, and Don spent the rest of the day pulling out the flooring all the way back to the chimney, as that's the first section they're going to work on. Leaving the floor in on the other section gives them a place to put debris and lets them keep up a wall that's holding the air conditioner up in the attic. When he was finished, Don installed the giant railing to keep me from falling to my death, because he's just a nice guy.
Soon, he'll start cutting out the joists and the old bathroom pipes (the plumber's going to be replacing them anyway) and there'll be a vast open space to be filled in with new joists and subfloor next time his dad comes over. Which, hopefully, will be soon. Scheduling these days is a nightmare.
Tuesday, February 10, 2009
clarification
I thought maybe all of this 'front half of the house' versus 'back half of the house' talk might be a little confusing to those of you who haven't actually been in our house (although considering my dwindling readership, that might not be very many! Must post more). So I thought I'd snap a quick picture that's the opposite of the 'status' pictures I've been taking.

I took this picture from the 'front half' -- standing on the new subfloor. You can see the staircase railing that's always in the foreground of the status pictures, so it's pretty easy to see where I usually stand to take them, tucked away into the little corner at the top of the stairs. What you're looking at straight-on is what I always refer to as the 'back half of the house.' It's actually less than half, but it's easier to call it that. It consists of the back bedroom -- what will someday be the guest bedroom that you're all invited to come stay in -- and the guest bathroom. We're currently using the guest bedroom as our bedroom, and will move all our stuff over onto the new side once the walls have been framed in, as I mentioned.
The current conundrum is what to do about the wall you see in the picture. It's got to come down -- it's positioned right over the section of floor where the joists mysteriously change direction, and all the joists have to come out so that can be fixed. Unfortunately, it's also holding up the weight of the heat pump in the attic. Which is a very heavy thing. So part of the demolition process for the back half of the house is going to be figuring out what to do about that. Fun times!
I took this picture from the 'front half' -- standing on the new subfloor. You can see the staircase railing that's always in the foreground of the status pictures, so it's pretty easy to see where I usually stand to take them, tucked away into the little corner at the top of the stairs. What you're looking at straight-on is what I always refer to as the 'back half of the house.' It's actually less than half, but it's easier to call it that. It consists of the back bedroom -- what will someday be the guest bedroom that you're all invited to come stay in -- and the guest bathroom. We're currently using the guest bedroom as our bedroom, and will move all our stuff over onto the new side once the walls have been framed in, as I mentioned.
The current conundrum is what to do about the wall you see in the picture. It's got to come down -- it's positioned right over the section of floor where the joists mysteriously change direction, and all the joists have to come out so that can be fixed. Unfortunately, it's also holding up the weight of the heat pump in the attic. Which is a very heavy thing. So part of the demolition process for the back half of the house is going to be figuring out what to do about that. Fun times!
Tuesday, January 20, 2009
brave new floor
Remember this? What a difference a few weekends can make! Don and his dad spent this Saturday working on the upstairs floor, and they got a truly tremendous amount of work done. Our friends at the Lansdowne Home Depot delivered a big pallet of lumber on Friday (with a truly excellent forklifting performance by one Randy, witnessed by yours truly) and at precisely 8 AM on Saturday the work began.
I don't know how many of you remember when we did this downstairs (what would we do without the Internet to help us remember?), but we are doing things a little differently upstairs. Rather than keeping the old joists in and sistering new ones to them to make the attached subfloor level, we elected to rip out the old joists and put new ones in. The reasons for this were many, but the important ones were that the old joists were in incredibly bad shape -- worse than the ones downstairs -- with cracking, rotting, and sometimes just plain bad installation. Additionally, there was the issue of the random change in the joists' direction in the middle of the house. So, all in all, it was deemed more sensible to just replace the joists upstairs.
The first few joists around the staircase and in the future master bathroom were ripped out ASAP, and the first piece of wood went up against the exterior wall of the house.

Here's where the clever part came in. Using that first joist as their baseline, they were then able to install a sill on the front wall of the house, creating a level base to nail all the joists into. The edge of the porch ceiling provided another level base, to end the first joists (front of house to mid-master bedroom) and start the second (mid-master bedroom back to center of house). In the picture below, they're setting the first of the mid-house joists. There's a lot of measuring involved. The end of the joist is resting on the wall that divides the center of the house downstairs, between the living room and everything else. When they do the back half of the floor upstairs, they'll install an end cap against that layer of joists for some extra stability.

I had honestly expected them to just get the wall cut down, move the lumber inside (Home Depot will only deliver to your driveway), and get the first few joists laid, mostly in the front section. But you can see what they accomplished by the end of the day on Saturday below -- Don was installing the last few pieces of cross-blocking when I took the last pictures of the day. Check out the difference between the picture below and the image from the 'vast wasteland' post linked at the top of this post! They're taken from the same place (squeezed into the tool closet which will someday be the guest bathroom) and the changes are awesome.

As a final note, I'd like to point out that anybody who follows me on Twitter, particularly on Saturdays, will generally get the play-by-play commentary of all of this stuff going on as it happens. It's a fun time.
I don't know how many of you remember when we did this downstairs (what would we do without the Internet to help us remember?), but we are doing things a little differently upstairs. Rather than keeping the old joists in and sistering new ones to them to make the attached subfloor level, we elected to rip out the old joists and put new ones in. The reasons for this were many, but the important ones were that the old joists were in incredibly bad shape -- worse than the ones downstairs -- with cracking, rotting, and sometimes just plain bad installation. Additionally, there was the issue of the random change in the joists' direction in the middle of the house. So, all in all, it was deemed more sensible to just replace the joists upstairs.
The first few joists around the staircase and in the future master bathroom were ripped out ASAP, and the first piece of wood went up against the exterior wall of the house.
Here's where the clever part came in. Using that first joist as their baseline, they were then able to install a sill on the front wall of the house, creating a level base to nail all the joists into. The edge of the porch ceiling provided another level base, to end the first joists (front of house to mid-master bedroom) and start the second (mid-master bedroom back to center of house). In the picture below, they're setting the first of the mid-house joists. There's a lot of measuring involved. The end of the joist is resting on the wall that divides the center of the house downstairs, between the living room and everything else. When they do the back half of the floor upstairs, they'll install an end cap against that layer of joists for some extra stability.
I had honestly expected them to just get the wall cut down, move the lumber inside (Home Depot will only deliver to your driveway), and get the first few joists laid, mostly in the front section. But you can see what they accomplished by the end of the day on Saturday below -- Don was installing the last few pieces of cross-blocking when I took the last pictures of the day. Check out the difference between the picture below and the image from the 'vast wasteland' post linked at the top of this post! They're taken from the same place (squeezed into the tool closet which will someday be the guest bathroom) and the changes are awesome.
As a final note, I'd like to point out that anybody who follows me on Twitter, particularly on Saturdays, will generally get the play-by-play commentary of all of this stuff going on as it happens. It's a fun time.
Subscribe to:
Posts (Atom)