
Thanks in no small part to some free publicity, site traffic here at AP has skyrocketed. Because of this, Don has finally agreed that I do, in fact, need a new camera. Hooray! Since photos are a pretty intrinsic part of this whole deal-io, I've been pestering him for a while to get me a new digital camera, as the old one is one that I've had since before I went to college and isn't very good at things like close-up shots of delicious salads or action shots of adorable kitty-cats or what have you.
So! I'm getting this awesome camera. Not a high-end SLR or anything, but exactly what I need for my current camera usage, and maybe even a bit more. We played with it at CompUSA the other night and we both agreed that it was pretty darn cool. Then it turned out that Amazon had it for super-cheap, and we were super-sold. We won't be buying it for a few days -- must work out a few things regarding Don's job-or-lack-thereof situation -- but we will be buying it.
So thanks, clickers! You got me a new camera! Hooray!
Wednesday, May 31, 2006
Tuesday, May 30, 2006
spontaneous barbeque

We didn't expect to have a cookout on Memorial Day. Normally, everyone goes over to Don's parents' house -- but we'd all gone out to dinner with them the night before, to celebrate three different people's birthdays which had as yet gone uncelebrated (that's just how it works in that family). So they decided not to do anything. Don looked a little disappointed -- he holds great store in traditions -- so I suggested that we have everyone over to our place. This idea was taken up and embellished, so what actually happened was that the menfolk -- Don, his father, his aunt's fiance, and his sister's boyfriend -- all went golfing in the morning (at 6 AM, no less), and then everyone made their way to our house at about three, after they'd had time to recover from all that trekking around the green.
We were a little unprepared, which made Don grumpy. He hates being unprepared. I think we did pretty well for less than twenty-four hours notice, though. We hunted down some tables and benches, and found a fifty gallon cooler drum under the front steps (we found out later that it had come from Don's mother's father as some sort of gift to the in-laws -- apparently he could get them either very cheaply or free from wherever he worked). We filled the cooler with ice, stuck in some sodas and beers, and started grilling.
We didn't do too badly, for our first time. That was the general consensus, anyway. There were several comments along the lines of "Well, they'll learn," especially after Don put everything on the grill at the same time. Oops.
So, in the spirit of learning experiences, I'll give you all my recipe for tomato and feta salad -- which never goes wrong. This is the dish I'm usually asked to bring to parties; I've even been asked to make it for parties I wasn't invited to! It's a great summer salad, particularly if you can get really fresh local tomatoes (we like to go to Vince's, near Cromwell Station, for fresh produce).
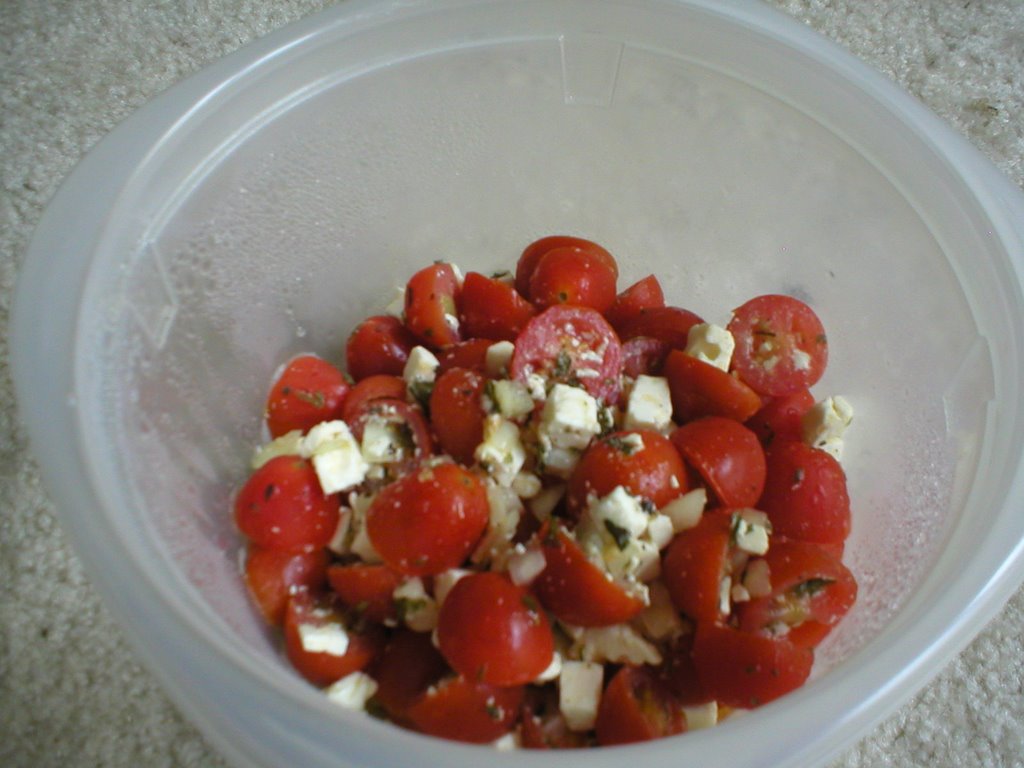
Tomato and Feta Salad
2 pints grape or cherry tomatoes, halved
4 ounces feta cheese, cubed in small cubes
2 tablespoons diced onion (I like red, but you can use anything)
1/8 teaspoon garlic powder
1 teaspoons dried basil
1 teaspoons dried parsley
1/2 teaspoon dried thyme
1/4 teaspoon cracked black pepper
2 tablespoons white wine vinegar
3 tablespoons olive oil
Mix everything together in a big bowl. Taste it -- all of the measurements above are approximations, since I don't measure when I make this. Adjust whatever you need to for your particular tastes. If it's too vinegary for you, take out as much liquid as possible from the bottom of the bowl. That will mellow it out a bit. This salad is best served chilled, so make it an hour or so ahead and stick it in the fridge while you prepare everything else.
Friday, May 26, 2006
if you see me, ask for one
I'm headed out to Balticon for the weekend, so posts about furniture finishing and our new driveway are going to have to wait. But I'll leave you with an image of the cute business cards I designed to hand out to anyone I meet who might be interested in AP -- to save them the trouble of having to write the address down! Not the most fabulous of cards, but for a couple of hours of effort on a Friday afternoon I think they'll be enough to get the job done.


Thursday, May 25, 2006
reader questions: destructo-cat
I got a reader question today, and I thought I'd take the time to answer it here instead of in the comments as usual, since it's got some bearing on some other stuff I plan to go into fairly soon.
Snay asked:
"I've got a cat who is steadily scratching away the framing from the bathroom door. I don't really care to stop her (becuase I rent and my security deposit is only like $100), but I'd like to know if there's any "quick fix" to at least make it look a little better ... ?"
Well, there isn't a magic wand, but the fastest, simplest thing you can do is to buy some sandpaper (or, if you're like me, root around in somebody else's toolbox until you find some stray sandpaper), and sand down the rough spot. Make sure to sand a little bit around it so it's not immediately obvious that half of the thickness of the frame is gone in one area. If your doorframe is unfinished or raw wood, you can stop there.
Incidentally, if it is unfinished, that may be why the cat is scratching it -- our cat will only scratch unfinished wood; a piece of scrap lumber makes her just as happy as the most expensive cat toy we can buy, and our couches have been untouched since the day we bought them.
If your doorframe is finished in a wood stain and you'd like it to not look totally weird, you'll need to buy a small can of stain in the closest color you can find to the existing stain. It shouldn't be too hard -- most rental places use very standard stains and finishes. Buy a teeny little can of stain and keep it on hand for other things you or your cat might destroy. After you've stained it, I'd recommend slapping some clear polyurethane on top. Make sure, again, to match whatever finish is on the rest of the wood (it comes in satin, semi-gloss, and high-gloss).
Of course, I'm going to tell you to use water-based products. I can't stress it enough. It's so much safer, especially in this situation, with a pet at nose-level. Both stain and polyurethane come in water-based versions. If you're using Minwax, which is what they sell at Home Depot, it's the blue cans, not the yellow cans.
If your frame is painted, sand it down and decide whether you want to go to the effort of getting your paint color matched in order to get the right color of paint to touch up (hint: I can virtually guarantee your answer will be no -- matching paint for little touch-ups is Not Worth It with capital letters). At least it won't be quite so rough anymore.
I'm going to go into a lot further detail about stains and finishes in another post very soon, when I talk about finishing furniture. Stay tuned.
let's talk caulk
Removing caulk, that is. This is another of those questions I got a lot when I worked at the paint desk in Home Depot, and it's one that has a surprisingly easy answer. It's not fun, and it's messy and time-consuming, but it's not nearly as difficult as people seem to expect it to be. So far, I've done this twice, for two different reasons. The first time I did it, we were selling our first house, and the bathroom was really, really gross. Not because we're slobs (I swear we aren't), but simply because the house was more than thirty years old and nothing had been replaced. In a house with only one bathtub, you're going to see some wear and tear. The grout was filthy, and the caulk was literally black and half rotted away with the accumulated dirt of thirty years. Not pleasant. We determined that the caulk was uncleanable (the grout I actually managed to get, if not sparkling, very close to clean by using a Mr. Clean Magic Eraser; also good for pencil marks which your fiance has mysteriously drawn all over the wall in the stairwell, incidentally) and needed to be removed. I knew the theory, having explained it patiently to customers in the paint department. So I did it.
The second time around, Don made it clear that caulk-removal was officially My Job. He said it was because I already knew how to do it -- I suspect it was really because he hates to touch anything slimy. He won't go near a raw chicken, either. Anyway, this second time was of course at Mr. and Mrs. V's house. I'll be doing it again at least twice; there are two full baths in our house, and they'll both be redone. Sigh. So here is how you remove caulk.

The first thing you need is this marvelous product, Caulk-Be-Gone. Technically, one tube will do you for a standard tub, but I always buy two. Just in case. It's cheap, don't worry about it. Basically, what this stuff does is release the part of caulk that makes it adhere to other things. The caulk doesn't melt away, it just releases its hold on the tub and the tile/plastic/whatever you've got around the tub. Also it gets really, really slimy. Crucial tip: Wear gloves, and work quickly. The acid in the goop will actually slowly eat away your latex gloves (yummy!), and, while it won't kill you, you really don't want to touch it.
So what you do is this:

Squeeze the goop onto the caulk around the tub. Use more, not less; the more you use, the more it has to work with. The best result is for the entire gap between tub and surround to be covered in green goo. Start from above, too -- the stuff oozes like crazy. If you have to -- and I usually do -- go back over your work again, piling more goop on top to make sure you are really covering all the caulk. This is why I usually buy two tubes, just in case. Then you let it sit for the time specified on the tube of goo. I think it's something like an hour or so. Try to let it sit the full amount of time, to let it do the maximum amount of slimy acidy whatever it is that it does.
Then comes the scraping.

There is no specific tool for scraping caulk. The most effective tool is the five-in-one tool, which you may remember from the wallpaper discussion. It's got the two things you need: a flat scrapey bit, and a pointy bit. You can use anything else you can find with both of those bits, but there is no good reason not to have a five-in-one in your house. You can use it for everything. So you take your scraper, and you scrape. Use enough pressure to make sure that you're actually scraping everything up, and moving the edge of your scraper along the tub itself. Give yourself a 'garbage pile' -- line a section of the tub with several paper towels, or just put an open garbage bag nearby. You'll want to fling the buildup of goop and caulk that you're scraping up into it. Also have plenty of paper towels nearby, as you'll want to wipe the blade of your scraper fairly often to make sure that you aren't just spreading more goop. Go about six inches at a time, and remove as much as possible in one scrape. Then go back over the area you just did, and scrape it again until you are sure there is no remaining caulk on the tub. This usually involves getting up close and personal and peering at the surface of the tub until your eyes feel like they are going to pop out of your head, but it's important. You have to get those little bits now, while they're still affected by the Caulk-Be-Gone. If they dry up again they'll be very hard to get off.
Sometimes, once you've used your scraper to get an end up, you can reach down and simply pull the caulk away from the wall in one great long slimy unit. This is rather satisfying. You'll still have to go back over and get the little bits and whatever goop is left, though. At the very end, when you've got all the caulk out and all the bits up, and you're ready to clean up, go ahead and wipe down the whole surface to make sure you haven't left any goop anywhere. Don't worry about rinsing, just wipe it thoroughly and let it dry and you're ready to go with your new caulk (or your demolition, whichever you prefer).
When you're cleaning up, try to get as much goop and caulk in the garbage as possible, rather than rinsing it down the bathtub drain. The caulk is still solid and will remain so; remember, the acid doesn't melt the caulk, it simply releases the adhesive part of it. If you wash too much down the drain it'll clog your pipes. The goop itself is not great for pipes, either. So try to scrape as much as you can into the trash.
And that, my friends, is how you remove caulk.
The second time around, Don made it clear that caulk-removal was officially My Job. He said it was because I already knew how to do it -- I suspect it was really because he hates to touch anything slimy. He won't go near a raw chicken, either. Anyway, this second time was of course at Mr. and Mrs. V's house. I'll be doing it again at least twice; there are two full baths in our house, and they'll both be redone. Sigh. So here is how you remove caulk.
The first thing you need is this marvelous product, Caulk-Be-Gone. Technically, one tube will do you for a standard tub, but I always buy two. Just in case. It's cheap, don't worry about it. Basically, what this stuff does is release the part of caulk that makes it adhere to other things. The caulk doesn't melt away, it just releases its hold on the tub and the tile/plastic/whatever you've got around the tub. Also it gets really, really slimy. Crucial tip: Wear gloves, and work quickly. The acid in the goop will actually slowly eat away your latex gloves (yummy!), and, while it won't kill you, you really don't want to touch it.
So what you do is this:
Squeeze the goop onto the caulk around the tub. Use more, not less; the more you use, the more it has to work with. The best result is for the entire gap between tub and surround to be covered in green goo. Start from above, too -- the stuff oozes like crazy. If you have to -- and I usually do -- go back over your work again, piling more goop on top to make sure you are really covering all the caulk. This is why I usually buy two tubes, just in case. Then you let it sit for the time specified on the tube of goo. I think it's something like an hour or so. Try to let it sit the full amount of time, to let it do the maximum amount of slimy acidy whatever it is that it does.
Then comes the scraping.
There is no specific tool for scraping caulk. The most effective tool is the five-in-one tool, which you may remember from the wallpaper discussion. It's got the two things you need: a flat scrapey bit, and a pointy bit. You can use anything else you can find with both of those bits, but there is no good reason not to have a five-in-one in your house. You can use it for everything. So you take your scraper, and you scrape. Use enough pressure to make sure that you're actually scraping everything up, and moving the edge of your scraper along the tub itself. Give yourself a 'garbage pile' -- line a section of the tub with several paper towels, or just put an open garbage bag nearby. You'll want to fling the buildup of goop and caulk that you're scraping up into it. Also have plenty of paper towels nearby, as you'll want to wipe the blade of your scraper fairly often to make sure that you aren't just spreading more goop. Go about six inches at a time, and remove as much as possible in one scrape. Then go back over the area you just did, and scrape it again until you are sure there is no remaining caulk on the tub. This usually involves getting up close and personal and peering at the surface of the tub until your eyes feel like they are going to pop out of your head, but it's important. You have to get those little bits now, while they're still affected by the Caulk-Be-Gone. If they dry up again they'll be very hard to get off.
Sometimes, once you've used your scraper to get an end up, you can reach down and simply pull the caulk away from the wall in one great long slimy unit. This is rather satisfying. You'll still have to go back over and get the little bits and whatever goop is left, though. At the very end, when you've got all the caulk out and all the bits up, and you're ready to clean up, go ahead and wipe down the whole surface to make sure you haven't left any goop anywhere. Don't worry about rinsing, just wipe it thoroughly and let it dry and you're ready to go with your new caulk (or your demolition, whichever you prefer).
When you're cleaning up, try to get as much goop and caulk in the garbage as possible, rather than rinsing it down the bathtub drain. The caulk is still solid and will remain so; remember, the acid doesn't melt the caulk, it simply releases the adhesive part of it. If you wash too much down the drain it'll clog your pipes. The goop itself is not great for pipes, either. So try to scrape as much as you can into the trash.
And that, my friends, is how you remove caulk.
Wednesday, May 24, 2006
house beautiful
I got my first two issues of House Beautiful in the mail yesterday. I'm not sure why they sent me the May and June issues at the same time, but I don't mind. It makes for good train reading.
When I worked at Home Depot answering phones in the phone center, I used to head over to the big magazine rack before my shift and load up on magazines to read while I waited for angry customers to call. House Beautiful was one of my favorites; when I left Home Depot for the Real World (tm), I decided to get a subscription to it as soon as I could afford it. Well, I happened to have a gift certificate to Amazon.com sitting around a while ago -- we have an Amazon.com credit card, and we get gift certificates after we spend a certain amount of money; since we use it for everything (groceries, gas, etc.), we get the gift certificates pretty regularly -- so I decided I would finally go ahead and order it. It was only twelve bucks for a subscription. Pretty reasonable, if you ask me. It's the very first time I've ever ordered my own magazine subscription. I feel so grown up.
When I worked at Home Depot answering phones in the phone center, I used to head over to the big magazine rack before my shift and load up on magazines to read while I waited for angry customers to call. House Beautiful was one of my favorites; when I left Home Depot for the Real World (tm), I decided to get a subscription to it as soon as I could afford it. Well, I happened to have a gift certificate to Amazon.com sitting around a while ago -- we have an Amazon.com credit card, and we get gift certificates after we spend a certain amount of money; since we use it for everything (groceries, gas, etc.), we get the gift certificates pretty regularly -- so I decided I would finally go ahead and order it. It was only twelve bucks for a subscription. Pretty reasonable, if you ask me. It's the very first time I've ever ordered my own magazine subscription. I feel so grown up.
Tuesday, May 23, 2006
fairies!

This weekend I went with Lindley (she of Angel's Accessories fame) to the Maryland Faerie Festival. There was a lot of fun to be had -- and a lot of adorable pictures to be taken, since we both love photography -- for seven bucks. Plus there was funnel cake. I love funnel cake. It's really amazing how much stuff there is to do in this area. I grew up in a fairly small town, and there wasn't a lot to do. Here, there's history half an hour away, plus museums, galleries, and great shopping. Then there are events like this. I also went to a gem and jewelry show this weekend, and we're all looking forward to the Maryland Renaissance Festival. We missed out on the Joint Services Open House Airshow, though. That was this weekend but I didn't find out about it until it was too late. Maybe next year. There are a lot of events coming up in the next couple of months -- much as I like working on the house, I can't wait to get out to some fun shindigs!
Monday, May 22, 2006
draining the pool
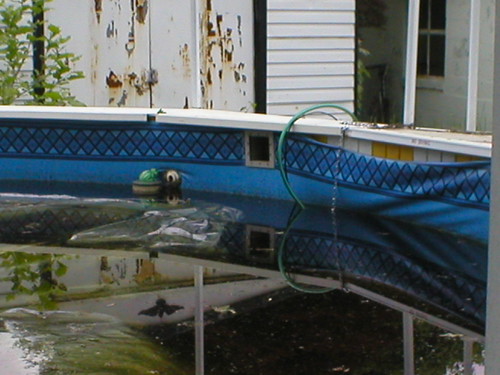
The aboveground pool in our backyard is unusable. It has been left to its own devices for several years with no maintenance, and it's filthy, structurally unsound, and completely unsafe in any number of ways. So we knew we'd have to take it out. This isn't a simple task. Our first step was to take down the rails around the pool's 'deck'. The ease with which this was accomplished made it even clearer how unsafe this thing was! Next step, of course, is to drain the pool. This is what has occupied us for the last couple of weeks.
First of all, you're never supposed to have to drain a pool. This is particularly true for inground pools, but it's also true for aboveground pools. With good maintenance, pools have extraordinarily long lifetimes -- and when the time comes to get rid of it, chances are you'll be replacing it, which means you just hire the pool guys to do it all. Our situation is fairly unique; we don't actually want this pool. Yes, we want a pool, but a) it will be an inground pool, b) it will be in a completely different area of the yard, and c) it's a long way off, anyway -- no way we've got the budget for a pool anytime soon. So we have the unusual goal of just getting rid of the damn pool. Which, of course, we're going to do ourselves. Okay, by 'ourselves' I really mean 'by coopting several burly fraternity brothers and giving them free beer in exchange for labor', but it's the same thing when you get down to it.
So. Draining the pool. Legally speaking, pool draining isn't cool. You can't drain it into the street, and you can't drain it into your pipes. Both of these will overload the city's water treatment facilities. Oh, maybe not if just little old you did it -- but let one person do it and somehow everyone will. Maybe they won't drain their whole pool, but they'll certainly drain the water off of the top of their pool cover. Which can add up (unless you have those cool pool covers that an elephant can stand on top of, we're totally getting one of those someday). So the only thing you're actually allowed to do is drain it into your own backyard -- and, legally, you're only allowed to do that if you own a large enough property to actually absorb all of that water. Which, of course, nobody really does. So what you do is a) make sure nobody's watching and b) don't do it all at once. Which is what has occupied Don for the last two weeks.
We started out with Don's dad's old submersible pump -- used for draining the pool cover at Chez Brinkley since time immemorial -- but it broke. So we bought a new one (and yes, when we're done Don's dad is borrowing it -- when you live ten blocks away from your parents tools become shared property, Don says). Don hooked the pump up to the hose and chained it to the side of the pool so that it wouldn't sink to the bottom and get mired in sludge (you can kind of see the setup in the picture above). Next he took the other end of the hose to the very back of our property and set it at the most uphill point he could find. Then he plugged the pump in and let it go to work. We have a lot of property, so he was able to let it run for quite a while before the back of our yard started getting swamplike. Then he turned it off and let the yard dry out for a day or two, then repeated the process. We were careful to never let the yard get more than a little muddy; the neighbors on our downhill side have a toddler, and we didn't want our filthy ten-year-old moldy water to come anywhere near their yard where she might get in it. It's taken about a week and a half -- with one rainstorm to take progress backwards -- but the pool is pretty much empty. We're having some issues getting the very last inch or so of water out of the bottom of the pool; the pump doesn't want to work on it, so I came home yesterday to find Don bailing the old-fashioned way, with a bucket and some rope. Gross.
The next step is renting a dumpster and calling all of our friends for a demolition party. I'll let you know how it goes.
no, really, they're alive and everything

We have three rosebushes. They're planted along the fence that divides the side yard from the back yard, on the far side of the house opposite the driveway. The middle one is the largest -- bigger than I am, actually -- and it's covered in the white roses pictured below. On the left is a medium-sized bush growing fabulous yellow roses (my second-favorite, after peach) that are incredibly large. On the right, in the corner of the yard, is the smallest and saddest rosebush, which seems to produce one bright pink rose at a time. These bushes have all done without any attention; nobody has taken care of this yard in almost ten years. I'm beginning to think I've found a plant I won't kill by proximity.


Thursday, May 18, 2006
we found out why they had drop ceilings
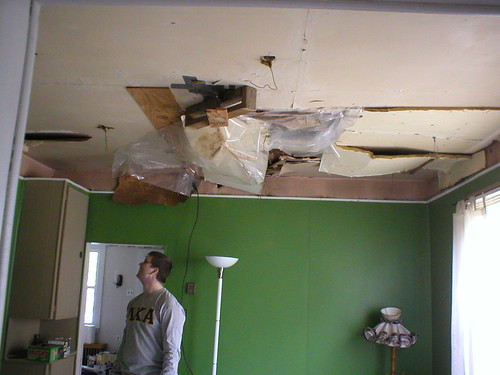
This is what was under the drop ceiling in our dining room. Apparently rather than fixing it they decided to put up the grid. We are going to have to rip all of this down and put up fresh drywall. The wood structure you see in the center was what was holding the ceiling fan up. You can also see, at the very top of the walls, that the room was once a pinky-peach color almost as hideous as its current bright green. Eventually, this room will become our office slash family room. It will not be green. Or peach.
Wednesday, May 17, 2006
for the latex paint googlers
I was looking at my site referrals, and I wanted to answer a question that a lot of searchers seem to be finding my blog by asking. After all, if Google's going to direct you here, I might as well answer your question, right?
Right. The reason the latex paint on your bathroom wall is peeling is because you have used a paint with the wrong sheen. Latex paint comes in several sheens or finishes -- think of them as 'levels of shininess' -- which you can check out in your paint swatch booklet or your hardware store. Or both. Whatever makes you happy. Basically, the shinier the paint, the better suited to bathrooms -- and kitchens, incidentally -- it is. The names of the basic levels differ from company to company, but your paint sales associate should be able to tell at a glance which one you've got and which one you want. My favorite company, Behr, makes interior latex paint in six different sheens: flat, flat enamel, eggshell, satin, semi-gloss, and high-gloss. Most other companies have similar products.
In any bathroom, you need either satin or semi-gloss. Which one you pick depends both on your personal preference and the level of use you expect the bathroom to get. In bathrooms with heavy use -- four kids, one bathroom sorts of use -- choose semi-gloss. In bathrooms which don't see as much use -- guest baths, for instance -- it's fine to go with the less-shiny satin finish.
Any finish above flat (don't ever use flat -- it sucks) has some kind of sealant built into it, but the satin and semi-gloss finishes have a great deal more. In addition to the sealant, they're less absorbent; the water will just bead up on the shininess rather than absorbing. This is why they're best for damp places like bathrooms (if we're talking half-baths and powder rooms, by the way, it really doesn't matter; this discussion is only true for bathrooms with showers and bathtubs... which I really hope you have somewhere in your house).
Before you paint, though, you should always prime. This is particularly true in places like bathrooms and kitchens; a primer protects the walls underneath your paint at a level that your paint can't. It also prevents any alarming things which might be hidden in the surface of your walls -- cigarette smoke stains, water damage remnants, bloodstains -- from showing through to the surface of the nice new paint color you've just picked. There's a good variety of amazingly effective primers on the market today. For a bathroom, make sure to choose one that's got some sort of mold and mildew resistance built in. Choose a water-based primer; that will interact most effectively with the water-based paint you're putting up next, and it has the added bonus of not being toxic. Hooray!
If you do have peeling paint in your bathroom, the primer is even more important. Clearly, you've got enough humidity going on in your bathroom to affect paint; yes, the higher-sheen paint will take care of it, but you're going to need to seal the damage that's already been done. Scrape as much of the peeling paint as you can and prime, then go ahead with the satin or semi-gloss finish. It'll fix it, I promise.
i'm back
Yes, it's been a month. Yes, that sucks. I'll try not to let it happen again. Lots of momentous things have been happening lately, including a weeklong trip to Washington State for Passover, me applying to graduate school, and Don getting laid off. All of this has combined to make me less than inclined to post here. I apologize.
A brief update, with more to come later: We finished the tub at Mr. and Mrs. V's house. It turned out nicely. Since Don has been laid off, he's had time to do a lot of work (and by work I mean therapeutic destruction) on our own house. He's taken down a drop ceiling or two, demolished the back deck (I made him leave me a little bit for tomato plants, though), ripped out the chain link fence separating the driveway and the backyard (and the accompanying ten-foot steel poles -- maybe I can make them into art!), and drained the pool.
He still hasn't mowed the grass, though. It's up to my waist.
Subscribe to:
Posts (Atom)