
The second time around, Don made it clear that caulk-removal was officially My Job. He said it was because I already knew how to do it -- I suspect it was really because he hates to touch anything slimy. He won't go near a raw chicken, either. Anyway, this second time was of course at Mr. and Mrs. V's house. I'll be doing it again at least twice; there are two full baths in our house, and they'll both be redone. Sigh. So here is how you remove caulk.

The first thing you need is this marvelous product, Caulk-Be-Gone. Technically, one tube will do you for a standard tub, but I always buy two. Just in case. It's cheap, don't worry about it. Basically, what this stuff does is release the part of caulk that makes it adhere to other things. The caulk doesn't melt away, it just releases its hold on the tub and the tile/plastic/whatever you've got around the tub. Also it gets really, really slimy. Crucial tip: Wear gloves, and work quickly. The acid in the goop will actually slowly eat away your latex gloves (yummy!), and, while it won't kill you, you really don't want to touch it.
So what you do is this:
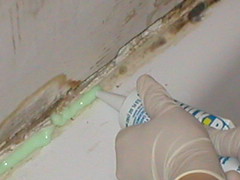
Squeeze the goop onto the caulk around the tub. Use more, not less; the more you use, the more it has to work with. The best result is for the entire gap between tub and surround to be covered in green goo. Start from above, too -- the stuff oozes like crazy. If you have to -- and I usually do -- go back over your work again, piling more goop on top to make sure you are really covering all the caulk. This is why I usually buy two tubes, just in case. Then you let it sit for the time specified on the tube of goo. I think it's something like an hour or so. Try to let it sit the full amount of time, to let it do the maximum amount of slimy acidy whatever it is that it does.
Then comes the scraping.
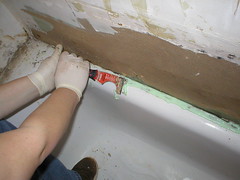
There is no specific tool for scraping caulk. The most effective tool is the five-in-one tool, which you may remember from the wallpaper discussion. It's got the two things you need: a flat scrapey bit, and a pointy bit. You can use anything else you can find with both of those bits, but there is no good reason not to have a five-in-one in your house. You can use it for everything. So you take your scraper, and you scrape. Use enough pressure to make sure that you're actually scraping everything up, and moving the edge of your scraper along the tub itself. Give yourself a 'garbage pile' -- line a section of the tub with several paper towels, or just put an open garbage bag nearby. You'll want to fling the buildup of goop and caulk that you're scraping up into it. Also have plenty of paper towels nearby, as you'll want to wipe the blade of your scraper fairly often to make sure that you aren't just spreading more goop. Go about six inches at a time, and remove as much as possible in one scrape. Then go back over the area you just did, and scrape it again until you are sure there is no remaining caulk on the tub. This usually involves getting up close and personal and peering at the surface of the tub until your eyes feel like they are going to pop out of your head, but it's important. You have to get those little bits now, while they're still affected by the Caulk-Be-Gone. If they dry up again they'll be very hard to get off.
Sometimes, once you've used your scraper to get an end up, you can reach down and simply pull the caulk away from the wall in one great long slimy unit. This is rather satisfying. You'll still have to go back over and get the little bits and whatever goop is left, though. At the very end, when you've got all the caulk out and all the bits up, and you're ready to clean up, go ahead and wipe down the whole surface to make sure you haven't left any goop anywhere. Don't worry about rinsing, just wipe it thoroughly and let it dry and you're ready to go with your new caulk (or your demolition, whichever you prefer).
When you're cleaning up, try to get as much goop and caulk in the garbage as possible, rather than rinsing it down the bathtub drain. The caulk is still solid and will remain so; remember, the acid doesn't melt the caulk, it simply releases the adhesive part of it. If you wash too much down the drain it'll clog your pipes. The goop itself is not great for pipes, either. So try to scrape as much as you can into the trash.
And that, my friends, is how you remove caulk.
11 comments:
Hey Jamaila -
Very cool that we ride the same train! I've been reading your blog for a few weeks now. I actually need to fix some caulking on my bathtub... some of it has cracked. Do I have to remove it to do this, or can I just add to it?
Maybe you covered this in your archives ... I've got a cat who is steadily scratching away the framing from the bathroom door. I don't really care to stop her (becuase I rent and my security deposit is only like $100), but I'd like to know if there's any "quick fix" to at least make it look a little better ... ?
I'm guessing probably not. Stupid cat.
Summer -- it depends on both how big the crack is and how old your caulk is. If you've got really old caulk, go ahead and replace it; if it's cracking now, it's going to keep cracking with age. The same is true if the crack is, like, ginormous. If you've got a huge crack going on, it's a sign of a deeper problem -- age, bad application, climate damage, whatever. It should be replaced. If it's just a small crack, you can probably go ahead and fill it up. They actually sell little squeeze-tubes of caulk now, which is really cool. You can use a bit and re-cap it for later. Make sure you get a tub and tile caulk, of course.
It's new caulk... the house was rehabbed last year. The key is that they put a deep soaking tub on the 2nd floor, and they didn't caulk with water in it. So it looks fine if you're just looking at it, but when you fill it with water and add a person, look at all those gaps... noticed a water stain on the ceiling downstairs and they said it was probably just the caulking... which isn't covered in the home warranty. of course. They'll fix the ceiling but I have to fix the caulk. Thanks for the help!
You're welcome! If it's faulty contractor work and is causing damage to your home -- like the water stain -- you can probably get the contractor who did it to come fix it, but it will be a hassle.
Also, I'm jealous of your soaking tub. ;)
Thank you Jamaila: that was very entertaining explanation of removing caulk...I use a straight edge razor in a little plastic holder...I was thinking of using Goof Off which should get at the left-overs...but I don't want to die a painful and untimely death (from Zylene).
Hi, Jamaila - Greetings from Roland Park. I was interested in the " . . .five-in-one tool, which you may remember from the wallpaper discussion . . ." and I followed the link, but I couldn't find it described there. Can you fill me in? Thanks, Lucy
Thanks for the tip! I just realized that a ceiling drip (and plaster disaster) downstairs in our 70 year old house was caused by...you guessed it...permeable caulk around the base of the tub (and people not closing the shower curtain). I re-caulked the upper part of the tub last summer and had no idea how to remove the fossilized bone like caulk around the base. Now I know! Thanks!
Do you know if it's possible to replace just a small section of caulk? There's a trouble spot on our shower (it's about three years old, and we moved in about five months ago), but the remainder is fine. Since we only have one bathroom, I'd rather not do the whole project if I can avoid it.
Hi Anonymous -
I don't know for sure if it's possible to just remove a small section. You'd have to slice it out with a knife rather than using a dissolving product. I would check the specifications on the back of a tube of caulk and see whether it says it will adhere to existing caulk. There may also be caulk patches available - it's been a long time since I worked in the industry!
@Malnutured Snay:
I hope someday you rent out a room to someone just like you (and your cat). Or maybe just have teenagers.
Post a Comment