Looking for more house tips? Search through Houseblogs.net!

Showing posts with label doors. Show all posts

Friday, September 10, 2010

pocket doors redux

We've been working on these doors for months. They still aren't done. But, in a fit of realism, we decided that we needed to shift our priorities a bit. Finishing the antique doors we're retrofitting into pocket doors from the dining room into the office isn't the most urgent thing on our plate. Right now it's far more important that we get the stairwell banister refinished and rehung, so that the people who come to our house are safe and so that we can have overnight guests. So we elected to get the doors out of our work space (i.e. the guest room) and store them out of the way until we can get back to them to finally sand and paint them.

And where better to store them than in the 'pockets' they are intended for?


Yes, we hung the doors! Aren't they fantastic? They're really old, and really heavy, but we got hardware rated for doors even heavier, so it all works incredibly smoothly. Just imagine that the glass is clean and they're painted white!

Wednesday, June 30, 2010

doors, continued

The door refinishing operations have been moved from under a tent in the backyard into the now-painted guest room, as the weather here in Baltimore has been horrifically humid for the last week or two - not the best conditions to leave untreated wood out in.


Once we scraped off all of the paint stripper and let everything dry out for a day or two, we borrowed a couple of power sanders from my father-in-law and Don went to work on the doors. At this writing, he has finished the first sanding, with 80-grit sandpaper, on the wide areas of the doors. The beveled edges of the inside molding are going to have to be done by hand - I think the best we can hope for is to take the top layer of varnish off and rough them up enough that primer and paint will stick well.


I think when we're done these doors will be beautiful, but they are a lot more work than I anticipated! I shudder to think that we still have to strip and refinish the stairway banister, as well as the (fortunately plainer) doors for all of the upstairs rooms.

Wednesday, June 23, 2010

refinishing

One of the 'small' projects I'm really excited about is finally refinishing all of our doors. When we gutted the house, we saved all of the original doors and put them in storage (okay, our garage) until we were ready to start finishing the house. When we cleared out the attic, we were excited to find two more doors up there, that Don's dad told us had been original to the house but removed during one of the family's extensive renovations. They were french doors, solid wood with squares of beveled glass inset. They were painted a hideous shade of teal, but seemed to be in good condition.

The discovery of these doors actually changed our structural plan mid-construction. We had originally planned for the transition from the dining room to the office to simply be a large opening, like the one that goes from dining room to living room. When we found the doors, though, we decided instead to install them as pocket doors dividing the dining room from the office. A header and doorframe had to be built where there had been nothing before. Fortunately nobody grumbled too much.

So now here we are, with a mostly finished house, and it's finally door time! We decided to start with the office doors, both because they're the most complicated and because we'd like to get the main level finished as fast as we can, since it's more 'public' space.

We set up a tent in the backyard, got some sawhorses, and got to work.


The citrus-based nontoxic stripper we used worked wonders! Hardly a hint of the teal remains - or the other three shades we discovered under it. Next up we'll sand the doors down with increasingly fine grits of sandpaper (80, 100, and finally 120) and then prime and paint them to match the rest of the trim in the house. They'll also have to get squared up and have pocket door hardware installed - but after all that effort they are going to look amazing!

Tuesday, March 09, 2010

almost there

The baseboards are fixed. They look lovely. In addition to fixing the baseboards that needed fixing and installing the ones they hadn't gotten to yet, yesterday the flooring people installed the flooring and baseboards in the master bedroom. It is very, very strange to wake up and swing my feet over to a real floor.

We're moving our office tonight, and they're coming back tomorrow to do the very last bits - the guest room and finishing off the stairs. And they're going to clear up some of the dust, which is why I'm going to wait to take a picture until then, so you can all see the floors in a relatively clean state. Much prettier that way.

The need to replace the front door has moved to the top of our list of priorities, as the old one is set very low - so low, in fact, that right now we can't use it, as it would scrape the new floor. It's also practically falling apart, so we knew we needed to replace it anyway. But the giant piece of cardboard protecting the floor in front of it is pretty unsightly, and we need to be able to use it at least once in a while even if we do normally use the back, so we're bumping it up to the top of the to-do list. Don has to write a paper for one of his graduate school classes this weekend, but I'm hoping that next weekend he and his dad might be able to replace the door. We went to the store last night and picked out a lovely door, so the decision-making part is done.

Other things to do as soon as we can: window trim and crown molding. More on those later, I think.

Monday, October 05, 2009

pocket doors

Pocket doors. They're awesome. Most of you have seen them, somewhere, sometime; they're doors that slide into the wall rather than swinging out into the room. They save a lot of space. What you may not have seen is the framing that's involved in installing a pocket door. When we first decided to put them in, we knew nothing about how to install them or frame for them. After a great deal of research, we discovered that they are SO EASY. All you have to do is leave a blank hole in your wall that's double (or so) the width of your doorway. Then you buy a kit -- we bought ours from the best in the business, Johnson Hardware. In fact, we bought five of them. The kit comes in a giant long box, and contains a header, studs, and all of the hardware to install them, plus of course the track for the door itself. You provide the door.

So. You've got your gap in the framed wall. You hammer in a nail at each end, at a prescribed height. Then you just hook the header onto the nails, rotate it into place, make sure it's level, and bang the nails the rest of the way in, adding a few more for good measure. Bang, header in place. The studs are, essentially, half-studs; they're metal-clad 1x3s. They slip into a metal bracket, which spaces them the right width apart on the floor. You attach the tops of the studs to the header, nail the bracket into your floor, and bam. You've got a pocket door frame.

Once the kit's installed, it's best if you can put in a little bit of framing above the header, just for the sake of structural stability. It's not too hard to bang in a few header studs. Overall, installing pocket doors is crazy easy. We've put them at the entrances to the master bathroom, master closet, and guest bathroom upstairs. We also decided to put in a double set of pocket doors downstairs, between the dining room and the office/library, where we had originally planned on leaving a large opening instead. We like the idea of being able to close off the office a bit - and the deciding factor was when we realized that we could use the antique doors we found in the attic as the double sliding doors. They're solid wood, with dozens of squares of antique beveled glass set in them. I'm looking forward to refinishing them and hanging them; they're the perfect entrance to a library.

In the picture below, you can see the double pocket doorframe we installed downstairs. It's not much more complicated than installing a single frame -- all you have to do is slice off a bit of one of the headers and hook it into the other one with a special bracket, sold separately. Then it's the same procedure.
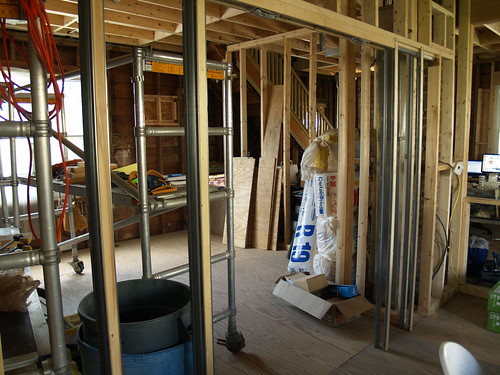

It may be a little hard to distinguish everything, what with the giant construction mess and scaffolding behind the doorframe. Sorry, not much I can do about it. I'm looking forward to getting rid of it as much as you are!

The drywallers will cover up the studs, of course, and leave the wide doorway open. When it warms up a little, I'll strip the doors and refinish them, and we'll hang them up and be done. The upstairs doorways, incidentally, are also getting antique doors -- we saved all of the original doors from the house and will be stripping, refinishing, and re-hanging them. The master bathroom and master closet may get replicas instead of the originals (or maybe we'll be able to find something at an architectural salvage shop), as they are new openings that weren't in the original house. For the time being, though, we're just going to be living without doors. Not a huge hardship, given what we've lived without so far!

Got any questions about installing pocket doors? Leave them in the comments, we'll try to answer! With the obligatory disclaimer, of course, that we're not experts and you probably shouldn't really take our advice on anything, but whatever.