
The baseboards are fixed. They look lovely. In addition to fixing the baseboards that needed fixing and installing the ones they hadn't gotten to yet, yesterday the flooring people installed the flooring and baseboards in the master bedroom. It is very, very strange to wake up and swing my feet over to a real floor.
We're moving our office tonight, and they're coming back tomorrow to do the very last bits - the guest room and finishing off the stairs. And they're going to clear up some of the dust, which is why I'm going to wait to take a picture until then, so you can all see the floors in a relatively clean state. Much prettier that way.
The need to replace the front door has moved to the top of our list of priorities, as the old one is set very low - so low, in fact, that right now we can't use it, as it would scrape the new floor. It's also practically falling apart, so we knew we needed to replace it anyway. But the giant piece of cardboard protecting the floor in front of it is pretty unsightly, and we need to be able to use it at least once in a while even if we do normally use the back, so we're bumping it up to the top of the to-do list. Don has to write a paper for one of his graduate school classes this weekend, but I'm hoping that next weekend he and his dad might be able to replace the door. We went to the store last night and picked out a lovely door, so the decision-making part is done.
Other things to do as soon as we can: window trim and crown molding. More on those later, I think.
Showing posts with label floor. Show all posts
Showing posts with label floor. Show all posts
Tuesday, March 09, 2010


Monday, February 09, 2009
hey, what's that?

I'll tell you what it is. It's a FINISHED SUBFLOOR, that's what it is! Holy crap. Don and his dad worked all day Saturday while I was down in Virginia having an Anapurna studio day. They tore down the master closet wall, finished up the joists, and installed more subfloor. Then, on Sunday (after brunch of course), Don and I decided to see if we could finish up. We installed the very last of the cross-bracing and the last seven or eight pieces of plywood to complete the subfloor. (And I used a circular saw by myself and retained all ten fingers, an accomplishment that was dimmed somewhat by the fact that I had to ask Don what the saw was called when I was telling my mother about it on the phone.)
Bear in mind, of course, that this is just the subfloor for the front half of the house. The back half, which we've been using as a bedroom, will have to get done as well. That's the reason you see those strange gaps in the forefront of the picture. The last row of tongue-and-groove plywood is actually just loosely screwed down about an inch away from the tongue of the row behind it. The reason we didn't fully install it is that it'll have to get taken up in order to lay the new joists, which will overlap and come out under that row. There's also a larger gap in between the plywood and the old floor of the back half of the house -- about six inches or so. It's not a huge issue for us, and it'll go away soon enough.
Next up: walls! The framing for the master suite needs to go in before we move our stuff over to that side -- it's hard to build a wall when there's a bed in the way, after all. Then, after we move our bedroom over to the other side (and the office into the living room to avoid raining debris), we'll do this all over again, and then I'll never have to talk about another subfloor as long as I live.
PS - Yes, that is the cat in the middle of the room in the picture. Just try and stop her.
PPS - We don't expect any work to get done on the house this weekend, what with it being Valentine's day and all. We personally aren't doing anything for Valentine's, in case you're curious, because I'll be up at Farpoint all weekend selling jewelry and resisting the urge to lick Alan Tudyk every time he walks by. Swing by if you aren't busy!
Thursday, January 15, 2009
please don't do this
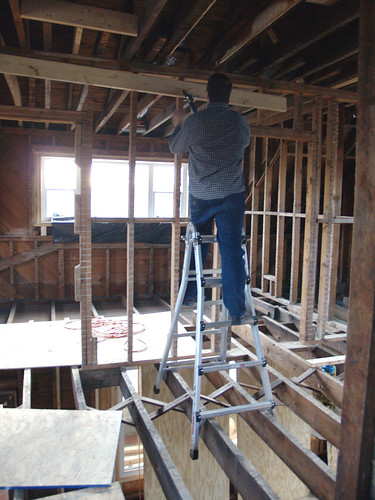
It's really not safe.
Don and his dad employed this extremely dubious ladder-balancing tactic to put up a header for the middle wall yesterday afternoon (I know, working on a weekday! Crazy!). It's not much of a header -- just a large piece of lumber nailed securely to a couple of uprights that aren't going anywhere -- but they assure me that because it's not holding up much of anything other than the joists above it (as opposed to, say, an air conditioning unit, a person, or several adventurous and fat cats) it will be fine. I've given up worrying about things like this; my attitude is "well, if it falls down it probably won't hurt anybody since we don't go over there, and if the house is ruined we can collect our insurance and move somewhere finished." Works for me.
They'll be cutting out the studs of that wall this weekend, I assume, and I just got a call confirming that a vast amount of lumber is going to be delivered here tomorrow. Very exciting.
Wednesday, January 14, 2009
plaster accomplished
I'm really far behind in uploading pictures, I'm sorry. This one's actually from last weekend, when Don and his dad spent the day finally getting rid of that plaster in the master bedroom. It was a fairly messy job, but it's all gone now.
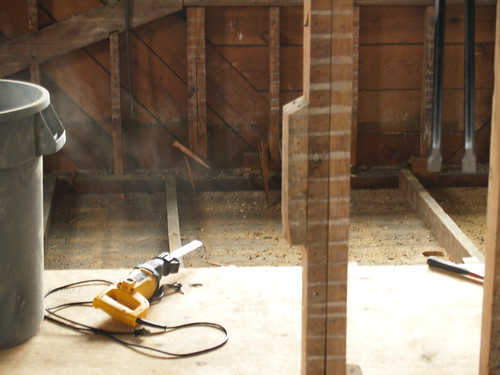
The picture above is what it looked like when they'd finally gotten all of the plaster out and were cleaning up. Never have we appreciated our ShopVac more! What the builders did was just put in a little mini-floor between the joists, which, alas, I didn't get a picture of. Rest assured there were only like four inches of plaster, not a foot or so, thank goodness. All the joists and "floorboards" in this section are gone -- the verticals you see here involve the front porch ceiling somehow -- although you can see bits of the joists from the next section sticking out from under the plywood in the foreground. The mini-floor was there solely to hold the plaster they poured. Very strange.
Up next, they'll be ripping out that middle wall you always see in these upstairs pictures. It's bearing, so they'll need to build a header first. I hear that's happening today. Then it's on to the "chop-and-drop" -- tearing out old joists and installing new ones. The first joists to go in will be in that front half of the master bedroom over the porch; before the plywood subfloor is put in on top of those joists, Don will run wiring for the porch's ceiling fans and lights, since this is the only chance we'll really have to access that area. Then insulation, probably, and the subfloor. The joisting and subflooring will continue over to the edge of the stairs, which is where the original floors are still intact. I think the master suite framing will come next, and we'll move our bedroom in there from the back bedroom. Then ripping up the floors and more chop-and-drop.
Don thinks that the upstairs floor will be done by mid-February. We'll see how it goes. Once the floor is done it's all a downhill race; the plumber will come and install the bathrooms, we'll run the electrical stuff in the evenings probably, and then it's insulation, drywall, and hardwood. But you all know that already.
The picture above is what it looked like when they'd finally gotten all of the plaster out and were cleaning up. Never have we appreciated our ShopVac more! What the builders did was just put in a little mini-floor between the joists, which, alas, I didn't get a picture of. Rest assured there were only like four inches of plaster, not a foot or so, thank goodness. All the joists and "floorboards" in this section are gone -- the verticals you see here involve the front porch ceiling somehow -- although you can see bits of the joists from the next section sticking out from under the plywood in the foreground. The mini-floor was there solely to hold the plaster they poured. Very strange.
Up next, they'll be ripping out that middle wall you always see in these upstairs pictures. It's bearing, so they'll need to build a header first. I hear that's happening today. Then it's on to the "chop-and-drop" -- tearing out old joists and installing new ones. The first joists to go in will be in that front half of the master bedroom over the porch; before the plywood subfloor is put in on top of those joists, Don will run wiring for the porch's ceiling fans and lights, since this is the only chance we'll really have to access that area. Then insulation, probably, and the subfloor. The joisting and subflooring will continue over to the edge of the stairs, which is where the original floors are still intact. I think the master suite framing will come next, and we'll move our bedroom in there from the back bedroom. Then ripping up the floors and more chop-and-drop.
Don thinks that the upstairs floor will be done by mid-February. We'll see how it goes. Once the floor is done it's all a downhill race; the plumber will come and install the bathrooms, we'll run the electrical stuff in the evenings probably, and then it's insulation, drywall, and hardwood. But you all know that already.
Thursday, July 05, 2007
all kinds of news
The biggest news is that the new and improved Anapurna website is up. And, unlike the old site, you can actually successfully use it to buy things from us! Yay! Go check it out.
Other stuff going on, that I thought I'd get down before it drifted away in the massive cloud of to-do lists and scheduling I often find myself in:
Don got a call from the HVAC guy (who, incidentally, has the pointiest shoulder blades I have ever seen on a human being). Said guy is going to come over tomorrow night with a contract for us to sign -- with the original price they quoted us (yay!). He's really truly officially going to start work on Monday. It's like a dream come true! Air conditioning!
We're getting our nearly-full dumpster switched out for an empty one on the 13th. Benjer must love us, we rent so many damn dumpsters. This will be the third this year.
Demolition day, as you all know, is on July 21st. Don't forget to tell me if you want to come.
Windows will be installed sometime after that, hopefully in early August. All the paperwork has been signed for the financial stuff on that one, now we're just waiting through their lead time. Plus, we're getting the demolition done, which will make things easier for them (since they're doing all the framing for us -- they don't have to worry about the demo part).
At some point -- I am guessing next weekend -- we will officially Move Downstairs. I haven't made a lot of progress on cleaning out the office. This must change.
Don says that he'd like to have the upstairs subfloors done and all the final framing in place by the time school starts (August 29th). Considering that we're going on vacation for a week within that timeframe, it's a tight schedule. We'll see how it goes. I'm a little concerned about the plumbing for the new master bathroom, but Don seems to think it's "NBD".
Other stuff going on, that I thought I'd get down before it drifted away in the massive cloud of to-do lists and scheduling I often find myself in:
Don got a call from the HVAC guy (who, incidentally, has the pointiest shoulder blades I have ever seen on a human being). Said guy is going to come over tomorrow night with a contract for us to sign -- with the original price they quoted us (yay!). He's really truly officially going to start work on Monday. It's like a dream come true! Air conditioning!
We're getting our nearly-full dumpster switched out for an empty one on the 13th. Benjer must love us, we rent so many damn dumpsters. This will be the third this year.
Demolition day, as you all know, is on July 21st. Don't forget to tell me if you want to come.
Windows will be installed sometime after that, hopefully in early August. All the paperwork has been signed for the financial stuff on that one, now we're just waiting through their lead time. Plus, we're getting the demolition done, which will make things easier for them (since they're doing all the framing for us -- they don't have to worry about the demo part).
At some point -- I am guessing next weekend -- we will officially Move Downstairs. I haven't made a lot of progress on cleaning out the office. This must change.
Don says that he'd like to have the upstairs subfloors done and all the final framing in place by the time school starts (August 29th). Considering that we're going on vacation for a week within that timeframe, it's a tight schedule. We'll see how it goes. I'm a little concerned about the plumbing for the new master bathroom, but Don seems to think it's "NBD".
Thursday, May 17, 2007
current house status
Here's what the first floor looks like right now. As you can see, the house is still being held up by the temporary wall -- Don and his dad were pretty much dead on their feet by 6 PM Saturday (they'd been working since 7 AM) so even though they had a couple of hours of daylight left they decided to go ahead and leave it at this stopping point. If you're wondering about layout, incidentally, this is the view from the kitchen (or will be, once we knock down the wall I was leaning against). The kitchen is at the back of the house. The room to the left will be the family room, the room we are in is the dining room, and the room the temporary wall is in is the living room. You can see the front door all the way in the background, and the open door on the far left leads down to the basement.
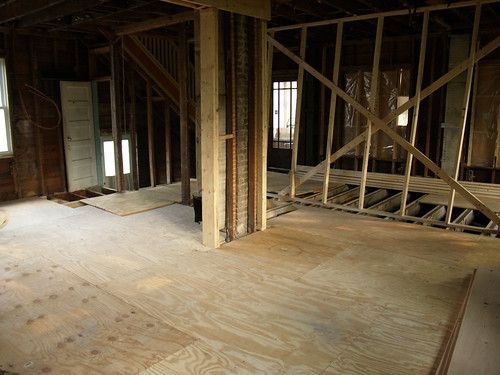
Don said this morning when I was leaving for work that he thinks they'll finish up on Saturday when they work again; as you can see, what's left to do is to build and install the new wall (a little more complicated than it might be, since we're doing the columns and built-ins), install three or four more joists (in the front hallway), and finish out the subfloor. I don't know if he's right in his assumption, but it would be awfully nice to get this over with. After this construction work is done, they need to wire a few outlets in the living room and then we're going to move all of our stuff either downstairs (the necessary stuff like bed, clothes, and computers) or out to the garage (the remainder of the boxes of stuff that are currently taking up space in the upstairs office). Then we finally get to call the HVAC guy.
PS - Local folks, don't forget about the Baltimore Blogger Happy Hour tonight! I'll be there.
Don said this morning when I was leaving for work that he thinks they'll finish up on Saturday when they work again; as you can see, what's left to do is to build and install the new wall (a little more complicated than it might be, since we're doing the columns and built-ins), install three or four more joists (in the front hallway), and finish out the subfloor. I don't know if he's right in his assumption, but it would be awfully nice to get this over with. After this construction work is done, they need to wire a few outlets in the living room and then we're going to move all of our stuff either downstairs (the necessary stuff like bed, clothes, and computers) or out to the garage (the remainder of the boxes of stuff that are currently taking up space in the upstairs office). Then we finally get to call the HVAC guy.
PS - Local folks, don't forget about the Baltimore Blogger Happy Hour tonight! I'll be there.
Friday, May 11, 2007
Wednesday, April 25, 2007
alas, ye floors
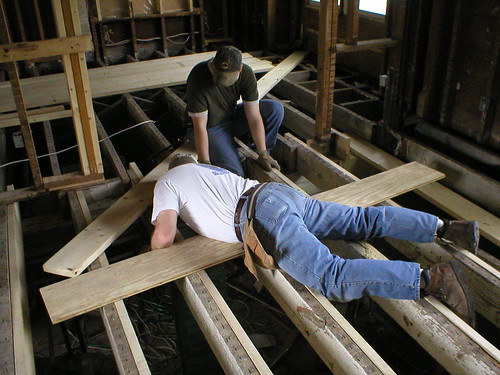
We were originally really hoping to save our hardwood floors. They're original to the house, and in most places the wood itself wasn't in truly horrible condition. Unfortunately, one of the major structural problems we found ourselves needing to address was the fact that every single floor in the house was severely out of level -- to the point that when I sit in my desk chair in the office, I roll backwards constantly! If I don't catch myself or lock my foot around the desk, I'll find myself all the way across the room in relatively short order. It's like that everywhere. The upstairs landing in particular had a huge dip when we bought the house; this is what we found when we tore up the carpet:
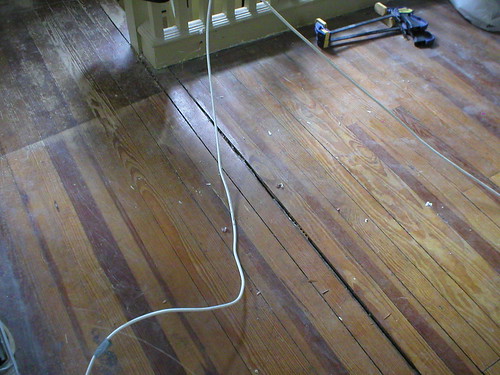
The thing is, even though those floorboards look like they're in pretty good condition aside from the whole massive-tilt issue, they have to come up. There weren't any subfloors in the house (hence the subject matter for my last I don't even know how many posts). So to level the floors so I'll stop rolling around the house every time I try to get some work done, we have to install new, level joists and a carefully leveled subfloor.
All that said, we thought we could still save the floors and maybe carefully put them back over the new subfloor, with a little fiddling to eliminate the obviously warped ones. Unfortunately, when the demo crew went to pull up the boards, we discovered that they're so old, dry, and hard (the boards, not the guys) that they crack and splinter no matter how carefully they're pulled up.
So, new floors it is. Or will be, someday. For now, we live on plywood.
The thing is, even though those floorboards look like they're in pretty good condition aside from the whole massive-tilt issue, they have to come up. There weren't any subfloors in the house (hence the subject matter for my last I don't even know how many posts). So to level the floors so I'll stop rolling around the house every time I try to get some work done, we have to install new, level joists and a carefully leveled subfloor.
All that said, we thought we could still save the floors and maybe carefully put them back over the new subfloor, with a little fiddling to eliminate the obviously warped ones. Unfortunately, when the demo crew went to pull up the boards, we discovered that they're so old, dry, and hard (the boards, not the guys) that they crack and splinter no matter how carefully they're pulled up.
So, new floors it is. Or will be, someday. For now, we live on plywood.
Monday, April 23, 2007
how to add cross bracing to your floors
There's no special secret to cross bracing. No special material, no special technique. You may remember the old cross bracing between our joists -- it was made of spare pieces of hardwood flooring. For the new cross bracing, Don and his dad just used spare pieces of joist beams, since they had it around from putting in new joists (this technically makes it "solid blocking", since it's just one piece of wood). They measured carefully and cut a piece of the board exactly to fit in between each joist (yes, you have to measure each space, since they are all going to be a little different) and then just nailed it into place.

The one thing they did differently than the old system was to actually add more cross bracing. Originally, the bracing just went in a straight line across the middle of the room. What we did instead was to install cross bracing at every seam in the subfloor. Every place where one sheet of plywood ends and another starts is reinforced with cross bracing all the way across. Basically, this winds up meaning that there's a row of cross bracing going across the entire space every four feet (since plywood comes in four-foot-wide sheets!). It makes the floor a lot more sturdy.
Good construction starts where you'll never even see it. Doing it right the first time means we won't have to go back in and do it again, and what we're building will last a long, long time. Adding the cross bracing every four feet certainly adds some time to the process, but it also creates a really strong foundation for everything we're going to build on top of that subfloor.
And heaven knows we don't want our grandchildren going in and renovating this house many years from now and complaining about us like we complain about this stuff!
The one thing they did differently than the old system was to actually add more cross bracing. Originally, the bracing just went in a straight line across the middle of the room. What we did instead was to install cross bracing at every seam in the subfloor. Every place where one sheet of plywood ends and another starts is reinforced with cross bracing all the way across. Basically, this winds up meaning that there's a row of cross bracing going across the entire space every four feet (since plywood comes in four-foot-wide sheets!). It makes the floor a lot more sturdy.
Good construction starts where you'll never even see it. Doing it right the first time means we won't have to go back in and do it again, and what we're building will last a long, long time. Adding the cross bracing every four feet certainly adds some time to the process, but it also creates a really strong foundation for everything we're going to build on top of that subfloor.
And heaven knows we don't want our grandchildren going in and renovating this house many years from now and complaining about us like we complain about this stuff!
Thursday, April 19, 2007
he's no duff
When Don and his dad went to install that first piece of subfloor, they discovered that they needed to do a little bit of work first. See, when they sistered the new joists in, the old floor was sooooo un-level that sometimes the top edges of the new joists were above the old ones, and sometimes the old ones peeked over the edge of the new ones. So all of the places where the old joists were higher than the new joists had to be planed down. Rather than going and getting a power planer or anything sensible, Don decided to use the reciprocating saw to just slice off the bits that needed to go.

The process looked a lot like leveling out a cake for decorating. Just... noisier.
The process looked a lot like leveling out a cake for decorating. Just... noisier.
Tuesday, April 17, 2007
we're the turtle, not the hare
Slow and steady wins the race! The first few pieces of subflooring are in. There are three or four more joists to put in in the dining room and family room, and then the living room and foyer need to be done, but right now, when you step from the kitchen into the family room, you step on solid floor. It's so exciting!
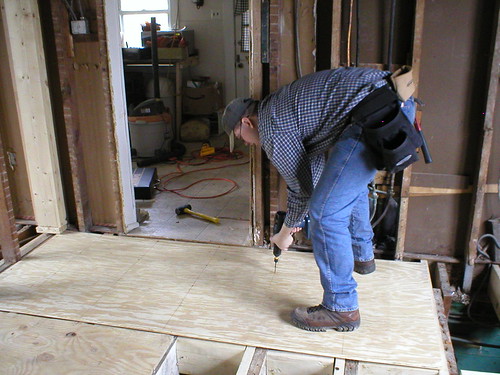
That's Don screwing in the first piece of subfloor (and making fun of me for asking him to face the camera a little more while he was doing it).
I'll post something a little more detailed about the process later this week; my workload has abruptly picked up so I'm busy trying to cross things off of my to-do list. But I took LOTS of pictures this weekend while the menfolk were working (they kept yelling for me to come downstairs with the camera because they were doing "something interesting" -- once it was snapping a chalk line, good lord). So don't worry, more is forthcoming.
That's Don screwing in the first piece of subfloor (and making fun of me for asking him to face the camera a little more while he was doing it).
I'll post something a little more detailed about the process later this week; my workload has abruptly picked up so I'm busy trying to cross things off of my to-do list. But I took LOTS of pictures this weekend while the menfolk were working (they kept yelling for me to come downstairs with the camera because they were doing "something interesting" -- once it was snapping a chalk line, good lord). So don't worry, more is forthcoming.
Thursday, April 12, 2007
for a construction day, they produced a lot of demolition debris
Before Don and his dad could get started on the floors, they discovered that they needed to do some further demolition work. Specifically, they had to remove all of the wiring that had been run through (and I do mean through) the joists in the basement.

I don't honestly know if this is standard practice or not; I don't believe we'll be doing it if we rewire (I think there are little brackets you can buy now to attach wires to other things without drilling through them) although Don, as usual, is the final arbiter of what we're going to do in cases like this (and by "Don", I mean "Don's dad").
In any case, they lost a good part of the morning by having to do this, cutting down on how much floor work they could do, but it wasn't such a great loss, since they wound up getting a massive head start on the electrical work that needed to be done.
For those of you curious about the procedure, they first turned all the electricity off in the house (putting a severe damper on my plans to do my design homework). When you do this, and are working with the breaker box, keep in mind that the main feed into the box is still going to be live. Don't touch it. Next step was to start cutting and pulling. They did this in a mostly-organized fashion, room by room, and followed each line all the way back to the breaker box. Once a breaker was empty, they removed it from the box (sorry, I have no idea how to do this -- maybe Don will comment with his technique, since I was upstairs being cold the whole time [edit: see Don's comment here]).
A large number of breakers were emptied and removed from the box, which is a great start on the rewiring work we need to do. So, not such a loss for the morning.
I don't honestly know if this is standard practice or not; I don't believe we'll be doing it if we rewire (I think there are little brackets you can buy now to attach wires to other things without drilling through them) although Don, as usual, is the final arbiter of what we're going to do in cases like this (and by "Don", I mean "Don's dad").
In any case, they lost a good part of the morning by having to do this, cutting down on how much floor work they could do, but it wasn't such a great loss, since they wound up getting a massive head start on the electrical work that needed to be done.
For those of you curious about the procedure, they first turned all the electricity off in the house (putting a severe damper on my plans to do my design homework). When you do this, and are working with the breaker box, keep in mind that the main feed into the box is still going to be live. Don't touch it. Next step was to start cutting and pulling. They did this in a mostly-organized fashion, room by room, and followed each line all the way back to the breaker box. Once a breaker was empty, they removed it from the box (sorry, I have no idea how to do this -- maybe Don will comment with his technique, since I was upstairs being cold the whole time [edit: see Don's comment here]).
A large number of breakers were emptied and removed from the box, which is a great start on the rewiring work we need to do. So, not such a loss for the morning.
Wednesday, April 11, 2007
how to level your old floors
Don and his dad got started on the process of making the floors on the first floor level this weekend, so I had them explain it to me (twice) so that I could explain it to you folks. The first step, of course, is to have some fraternity boys come rip out your floors for you.
Once you are down to the joists, you need to acquire some string. Take the string and use a line level to secure it above your first joist in a level position. You may have to do some triangulating to do this; Don tied one end of the string on the far wall, then took it diagonally over to his first joist in the center of the room and lined it up, then strung it diagonally all the way over to the near wall of the room (yes I know that's not really what triangulating is, I couldn't think of a better word). Just drive a nail in wherever you need an end of the string to be, and tie the string around it. And don't forget to put your line level on before you tie it off. Then you can fiddle the string up and down on your nails until it's level.
The next step is to "sister" your first joist. Sistering a joist means that, rather than removing an old, unlevel joist, you take a new one and put it in right next to the old one, attaching the two together for lots of support. Obviously, you use your now-level string to determine the level position of the new joist. Once you've gotten the first joist in, you can use that to determine the level of the next joist.
That's a fairly simplistic explanation of a slightly complicated process, but that's basically how you do it.
How you navigate your way across the open joists that now comprise your only floor is, of course, up to you.

Once you are down to the joists, you need to acquire some string. Take the string and use a line level to secure it above your first joist in a level position. You may have to do some triangulating to do this; Don tied one end of the string on the far wall, then took it diagonally over to his first joist in the center of the room and lined it up, then strung it diagonally all the way over to the near wall of the room (yes I know that's not really what triangulating is, I couldn't think of a better word). Just drive a nail in wherever you need an end of the string to be, and tie the string around it. And don't forget to put your line level on before you tie it off. Then you can fiddle the string up and down on your nails until it's level.
The next step is to "sister" your first joist. Sistering a joist means that, rather than removing an old, unlevel joist, you take a new one and put it in right next to the old one, attaching the two together for lots of support. Obviously, you use your now-level string to determine the level position of the new joist. Once you've gotten the first joist in, you can use that to determine the level of the next joist.
That's a fairly simplistic explanation of a slightly complicated process, but that's basically how you do it.
How you navigate your way across the open joists that now comprise your only floor is, of course, up to you.
Thursday, April 05, 2007
on bearing walls and floor joists
One of the things that was something of a surprise -- and a challenge -- to us was finding out which walls in our house were bearing walls. Since we wanted to make rather large holes in various walls to create a more open floor plan on the first floor, we need to know which walls might make the house fall down if we touched them. Pretty sensible of us, I think. Anyway, normally the easiest way to tell which is a bearing wall if you've got a little access to the innards of your house is to see which way the floor joists run. The bearing walls will be the ones which are perpendicular to the floor and ceiling joists (if I were better at physics and spatial relationships I'd be able to explain why this is true to you, but I'm not, so I'm just telling you what I know [somebody who is smarter than me will undoubtedly weigh in in the comments, keep an eye out]).
Anyway, so when we first pulled down the plaster in the dining room and family room, last May, we were surprised and a little dismayed to find that our handy little tip didn't work. See, the floor joists on the first floor run in the complete opposite direction of the floor joists on the second floor. Which is not supposed to happen. I mean, it's not like a horrible disaster which might cause the house to come crashing down around our ears or anything, but it's not really normal, either. And of course it made it awfully confusing trying to figure out which walls were load bearing.
As it turns out, all of the walls in the dining room are load bearing. So it didn't really matter anyway.
Anyway, now that the floors and ceilings and walls and stuff are all gone, I thought I'd try to get a photo of this little architectural phenomenon for you.
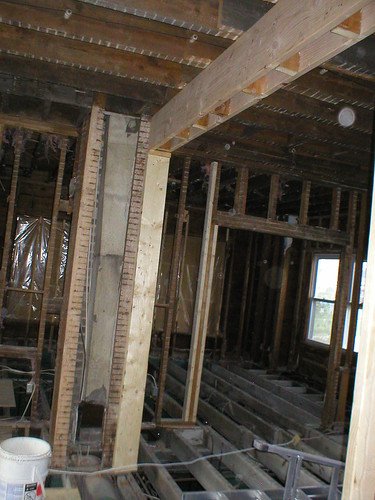
Somewhere to the left of the photo frame, the floor joists on the first floor actually somehow change direction. Like it's okay to do that or something. Not okay, floor! Not okay!
Anyway, so when we first pulled down the plaster in the dining room and family room, last May, we were surprised and a little dismayed to find that our handy little tip didn't work. See, the floor joists on the first floor run in the complete opposite direction of the floor joists on the second floor. Which is not supposed to happen. I mean, it's not like a horrible disaster which might cause the house to come crashing down around our ears or anything, but it's not really normal, either. And of course it made it awfully confusing trying to figure out which walls were load bearing.
As it turns out, all of the walls in the dining room are load bearing. So it didn't really matter anyway.
Anyway, now that the floors and ceilings and walls and stuff are all gone, I thought I'd try to get a photo of this little architectural phenomenon for you.
Somewhere to the left of the photo frame, the floor joists on the first floor actually somehow change direction. Like it's okay to do that or something. Not okay, floor! Not okay!
Tuesday, April 03, 2007
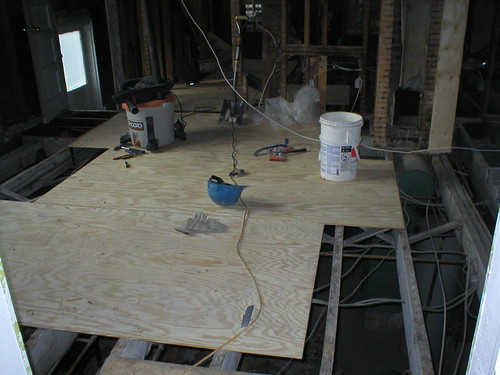
but if you don't have any floors anymore, how are you getting around the house?
On plywood. Carefully.
Subscribe to:
Posts (Atom)